ARM TEMPLATES WITH MICROSOFT VISUAL STUDIO 2017
In this article, I will describe how to write ARM templates an easy way with Microsoft Visual Studio 2017. Firstly we need to install MS Visual Studio 2017 with cloud extension.
You can download all code and template files from this github repository.
In the installation of the Microsoft Visual Studio 2017 just select ‘Azure Development‘, select components in the right side which we need to install and then press Installbutton.
Then we need go to the MS Visual Studio 2017 IDE. Press File -> New -> Projectbutton

In the opened page select ‘Azure Resource Group‘, input name and press OK button.

In the opened page select ‘Visual Studio Templates‘ -> Blank Template Microsoft -> Then press OK button

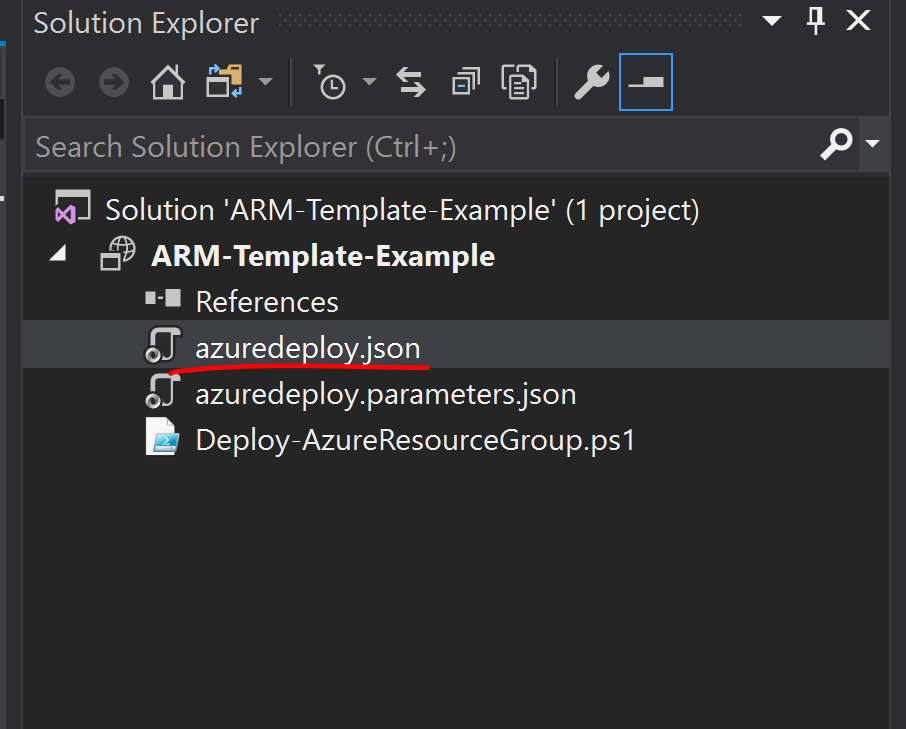
In the opened page go to the right side and double click to the ‘azuredeploy.json‘ file.
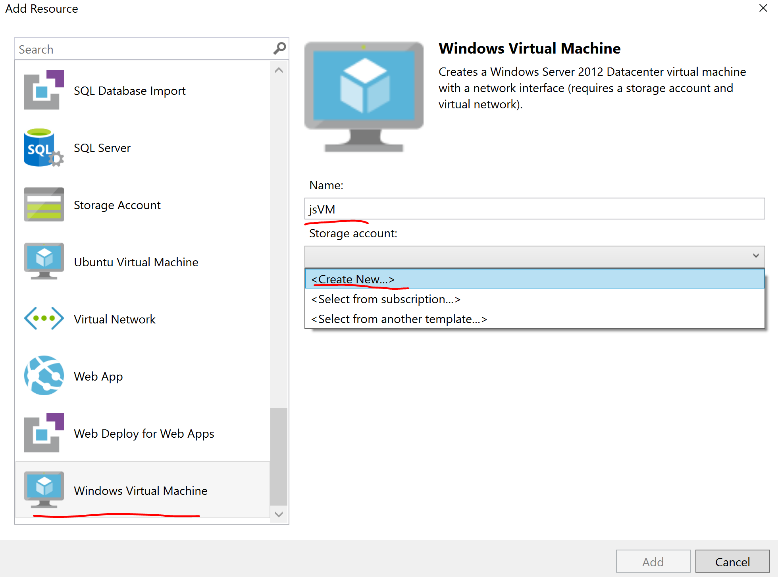
Go to the left side and right click on the ‘resources(0)‘ and then press Add New Resource


In the opened page select ‘Windows Virtual Machine‘ -> Enter name of new VM ‘jsVM‘ -> In the ‘Storage account‘ select ‘Create New‘
In the opened page will be automatically selected ‘Storage Account‘ -> Enter name of storage account as you wish (I entered ‘jsstacc‘) -> Then press Enter

It will back to the main page. For the ‘Virtual network/subnet‘ select ‘Create New

It will select automatically ‘Virtual Network‘ resource -> Enter name as you wish (I entered: jsVnet) and press Enter button

At the end press Add button:

Then in the left side right click on ‘resources(4)‘ button and press ‘Add New Resource‘ button. Enter name ‘jsDSC‘ -> Select VM ‘jsVM‘ and press Add button

It will automatically add new resource with name ‘jsDSC‘ under virtual machine ‘jsVM‘ resource(At the same time it will create new folder with name DSC then, inside of this folder will be created jsDSC.ps1 file. This file Desired State Configuration file which will be applied inside of virtual machine)

To public access our virtual machine we need create Public IP Address resource. Right click on resources(4) and press Add New Resource button. Then select ‘Public IP Address‘ enter name ‘jsPublicIP‘ for ‘jsVMNic‘ interface.

We need to add new script resource to do some works after DSC, inside of our Virtual Machine. Right click in the resources(5) and press ‘Add New Resource‘ button. Select exists Virtual Machine which created before:

Similar to the following lines will be added to the resources under Virtual Machine resources. Because I have edited the following lines for my needs(Resource will take 2 arguments which will be taken from our script for expand archive and copy content to the PUBLIC_HTML folder).
{
“name”: “jsWebDeploy”,
“type”: “extensions”,
“location”: “[resourceGroup().location]”,
“apiVersion”: “2016-03-30”,
“dependsOn”: [
“[resourceId(‘Microsoft.Compute/virtualMachines’, parameters(‘jsVMName’))]”,
“[resourceId(‘Microsoft.Compute/virtualMachines/extensions’, parameters(‘jsVMName’), ‘Microsoft.Powershell.DSC’)]”
],
“tags”: {
“displayName”: “jsWebDeploy”
},
“properties”: {
“publisher”: “Microsoft.Compute”,
“type”: “CustomScriptExtension”,
“typeHandlerVersion”: “1.4”,
“autoUpgradeMinorVersion”: true,
“settings”: {
“fileUris”: [
“[concat(parameters(‘_artifactsLocation’), ‘/’, variables(‘jsWebDeployScriptFolder’), ‘/’, variables(‘jsWebDeployScriptFileName’), parameters(‘_artifactsLocationSasToken’))]”
],
“commandToExecute”: “[concat(‘powershell -ExecutionPolicy Unrestricted -File ‘, variables(‘jsWebDeployScriptFolder’), ‘/’, variables(‘jsWebDeployScriptFileName’), ‘ -firstZipPack ‘, parameters(‘firstZipPackage’), ‘ -secondZipPack ‘, parameters(‘secondZipPackage’))]”
}
}
}
}
}
}
PowerShell script extension automatically will add the two variables which must be changed as following for our needs:
“jsWebDeployScriptFolder”: “Scripts”,
“jsWebDeployScriptFileName”: “jsWebDeploy.ps1”},
“jsWebDeployScriptFileName”: “jsWebDeploy.ps1”},
The content of the “jsWebDeploy.ps1” script file will be as following:
1
2
3
4
5
6
7
8
9
10
11
12
13
14
15
16
17
18
19
20
21
22
23
24
25
26
| Param([string] $firstZipPack,[string] $secondZipPack)[array]$ziparray = 0..1$zipFilesPath = @("C:\Software\$firstZipPack", "C:\Software\$secondZipPack")$pubHtmlFolders = @("C:\inetpub\firstwebapp", "C:\inetpub\secondwebapp")$extractPaths = @("C:\Software\firstwebapp\", "C:\Software\secondwebapp\")function Expand-Archives ($arrayname, $zipFiles, $extractedPaths) {foreach ( $index in $arrayname ) {Expand-Archive -Force -Path $zipFiles[$index] -DestinationPath $extractedPaths[$index]}}function Copy-ToPubHtml ($arrayname, $extractedPaths, $pubhtmlpaths) {foreach ( $index in $arrayname ) {Get-ChildItem -Path ("{0}{1}" -f $extractedPaths[$index], "*") -Recurse | ForEach-Object {Copy-Item -Path $_.FullName -Destination $pubhtmlpaths[$index] -Recurse -Force}}}Expand-Archives -arrayname $ziparray -zipFiles $zipFilesPath -extractedPaths $extractPathsCopy-ToPubHtml -arrayname $ziparray -extractedPaths $extractPaths -pubhtmlpaths $pubHtmlFolders |
At the end we need to see 5 new resources and two sub resources. But we need to add 2 new parameters ‘_artifactsLocation‘ and ‘_artifactsLocationSasToken‘ because they will be come from ‘Deploy-AzureResourceGroup.ps1‘ file as ‘$OptionalParameters‘

Then we need to add 4 new parameters(jsVMName, jsVMAdminUserName and jsVMAdminPassword, jsPublicIPDnsName) to the ‘azuredeploy.parameters.json‘ file which will be used inside of ‘azuredeploy.json‘ json file.
{
“$schema”: “https://schema.management.azure.com/schemas/2015-01-01/deploymentParameters.json#”,
“contentVersion”: “1.0.0.0”,
“parameters”: {
“jsVMName”: { “value”: “jsWindows” },
“jsVMAdminUserName”: { “value”: “jsAdmin” },
“jsVMAdminPassword”: { “value”: “jsAdminp@$$w0rd” },
“jsPublicIPDnsName”: { “value”: “jsarmvmdns” }
}
}
Inside of the project folder rename custom script folder to the Scripts and create new one with name Temps.

All powershell script files we will store in the ‘Scripts‘ folder and all template files we will store in the ‘Temps‘ folder. Create two New Compressed (zipped) Folder under ‘Temps‘ folder with the name ‘FirstSite.zip‘ and ‘SecondSite.zip‘. Create index.html file inside of this zip compressed folders with the following content (Just change First to Second in the SecondSite.zip compressed index.html file):
IT IS THE FIRST SITE PAGE!!!
We will modify our DSC file more dynamically. The content of the ‘jsDSC.ps1‘ script file will be as following. In this DSC file we will copy from Azure storage compressed 2 files for two sites. This archived files will be extracted in the Windows VM in two different public HTML folders and will listen on different ports (10080 and 10081). At the same time we need to configure our ARM template and parameter files to give this parameters to the DSC script.
1
2
3
4
5
6
7
8
9
10
11
12
13
14
15
16
17
18
19
20
21
22
23
24
25
26
27
28
29
30
31
32
33
34
35
36
37
38
39
40
41
42
43
44
45
46
47
48
49
50
51
52
53
54
55
56
57
58
59
60
61
62
63
64
65
66
67
68
69
70
71
72
73
74
75
76
77
78
79
80
81
82
83
84
85
86
87
88
89
90
91
92
93
94
95
96
97
98
99
100
101
102
103
104
105
106
107
108
109
110
| Configuration Main{Param ( [string] $nodeName,[string] $firstZipPackage,[string] $secondZipPackage)Import-DscResource -ModuleName xWebAdministrationImport-DscResource -ModuleName xPSDesiredStateConfigurationImport-DscResource -ModuleName PSDesiredStateConfigurationNode $nodeName{File FirstWebAppFolder {Type = 'Directory'DestinationPath = 'C:\inetpub\firstwebapp'Ensure = "Present"}File SecondWebAppFolder {Type = 'Directory'DestinationPath = 'C:\inetpub\secondwebapp'Ensure = "Present"}xRemoteFile firstZipDownload {Uri = "$firstZipPackage"DestinationPath = "C:\Software\FirstSite.zip"MatchSource = $true}xRemoteFile secondZipDownload {Uri = "$secondZipPackage"DestinationPath = "C:\Software\SecondSite.zip"MatchSource = $true}WindowsFeature WebServerRole{Name = "Web-Server"Ensure = "Present"}xWebsite DefaultSite{Ensure = "Present"Name = "Default Web Site"State = "Stopped"PhysicalPath = "C:\inetpub\wwwroot"DependsOn = "[WindowsFeature]WebServerRole"}WindowsFeature WebManagementConsole{Name = "Web-Mgmt-Console"Ensure = "Present"}WindowsFeature ASPNet45{Name = "Web-Asp-Net45"Ensure = "Present"}xWebAppPool firstWebAppPool{Name = "firstwebpool"Ensure = "Present"State = "Started"}xWebsite firstWebSite{Ensure = "Present"Name = "First Web Site"State = "Started"PhysicalPath = "C:\inetpub\firstwebapp"ApplicationPool = "firstwebpool"BindingInfo = MSFT_xWebBindingInformation{Protocol = "http"Port = 10080}DependsOn = "[xWebAppPool]firstWebAppPool"}xWebAppPool secondWebAppPool{Name = "secondwebpool"Ensure = "Present"State = "Started"}xWebsite secondWebSite{Ensure = "Present"Name = "Second Web Site"State = "Started"PhysicalPath = "C:\inetpub\secondwebapp"ApplicationPool = "secondwebpool"BindingInfo = MSFT_xWebBindingInformation{Protocol = "http"Port = 10081}DependsOn = "[xWebAppPool]secondWebAppPool"}}} |
In the ‘azuredeploy.parameters.json‘ file add two more parameters which will be used inside of ‘jsDSC.ps1‘ script file as storage URL for zip files.
{
“$schema”: “https://schema.management.azure.com/schemas/2015-01-01/deploymentParameters.json#”,
“contentVersion”: “1.0.0.0”,
“parameters”: {
“jsVMName”: { “value”: “jsWindows”},
“jsVMAdminUserName”: { “value”: “jsAdmin”},
“jsVMAdminPassword”: { “value”: “jsAdminp@$$w0rd”},
“jsPublicIPDnsName”: { “value”: “jsarmvmdns” },
“firstZipPackage”: { “value”: “FirstSite.zip” },
“secondZipPackage”: { “value”: “SecondSite.zip” }
}
}
We will change ‘azuredeploy.json‘ file to take parameters from ‘azuredeploy.parameters.json‘ file (Add to more parameters under parameters section).
“firstZipPackage”: {
“type”: “string”,
“minLength”: 10,
“metadata”: {
“description”: “First Web App zip file.”
}
},
“secondZipPackage”: {
“type”: “string”,
“minLength”: 10,
“metadata”: {
“description”: “Second Web App zip file.”
}
},
“type”: “string”,
“minLength”: 10,
“metadata”: {
“description”: “First Web App zip file.”
}
},
“secondZipPackage”: {
“type”: “string”,
“minLength”: 10,
“metadata”: {
“description”: “Second Web App zip file.”
}
},
For the ‘azuredeploy.json‘ file in the ‘resources‘ section under Virtual machine resource ‘jsVMName‘ have ‘resource‘ extension “Microsoft.Powershell.DSC” which must be configured to take 3 parameters (nodeName, firstZipPackage, secondZipPackage) for “jsDSC.ps1” DSC file. ‘Temps‘ is the folder from where zip files will be downloaded inside of Windows Virtual machine.
“configurationArguments”: {
“nodeName“: “[parameters(‘jsVMName’)]”,
“firstZipPackage“: “[concat(parameters(‘_artifactsLocation’), ‘/’, ‘Temps‘, ‘/’, parameters(‘firstZipPackage’), parameters(‘_artifactsLocationSasToken’))]”,
“secondZipPackage“: “[concat(parameters(‘_artifactsLocation’), ‘/’, ‘Temps‘, ‘/’, parameters(‘secondZipPackage’), parameters(‘_artifactsLocationSasToken’))]”
}
In the right side right click in the name ‘ARM-Template-Example‘ and press ‘Open Folder in File Explorer‘

In the opened page press File -> Open Windows PowerShell -> Open PowerShell as administrator

As we see it is the content of our project:

Install AzureRM and Azure module to your windows Desktop Powershell:
PS C:\Users\jamal.shahverdiyev\source\repos\ARM-Template-Example> Install-Module AzureRM -AllowClobber -Force
PS C:\Users\jamal.shahverdiyev\source\repos\ARM-Template-Example> Install-Module Azure -Force
PS C:\Users\jamal.shahverdiyev\source\repos\ARM-Template-Example> Install-Module AzureRM -AllowClobber -Force
PS C:\Users\jamal.shahverdiyev\source\repos\ARM-Template-Example> Install-Module Azure -Force
Login with your credentials to the azure portal (It will call new GUI page in which you need to input your credentials):
PS C:\Users\jamal.shahverdiyev\source\repos\ARM-Template-Example> Login-AzureRmAccount
Account : user.email@gmail.com
SubscriptionName : Microsoft Azure Enterprise
SubscriptionId : idididid-idid-idid-idid-idididididid
TenantId : idididid-idid-idid-idid-idididididid
Environment : AzureCloud


PS C:\Users\jamal.shahverdiyev\source\repos\ARM-Template-Example> Login-AzureRmAccount
Account : user.email@gmail.com
SubscriptionName : Microsoft Azure Enterprise
SubscriptionId : idididid-idid-idid-idid-idididididid
TenantId : idididid-idid-idid-idid-idididididid
Environment : AzureCloud
And the we need to save this credentials in the json file:
PS C:\Users\jamal.shahverdiyev\source\repos\ARM-Template-Example> Save-AzureRmContext -Path (“{0}{1}” -f (Get-Location), ‘\AzureCreds.json’)
PS C:\Users\jamal.shahverdiyev\source\repos\ARM-Template-Example> Save-AzureRmContext -Path (“{0}{1}” -f (Get-Location), ‘\AzureCreds.json’)
The open the ‘Deploy-AzureResourceGroup.ps1‘ script file which created automatically when project is created. After Try-Catch add the following line to get login to Azure Portal. It means when you will execute deployment script ‘Deploy-AzureResourceGroup.ps1‘ it will automatically login to the azure portal with your credentials which entered before.
Import-AzureRmContext -path (Get-ChildItem .\AzureCreds.json).FullName

Define ‘$ResourceGroupLocation‘ parameter in the ‘Deploy-AzureResourceGroup.ps1‘ script file statically to not as at the execution time. ($ResourceGroupLocation = ‘westeurope’,)

Start deployment from PowerShell or VS Code console as following:
PS C:\Users\jamal.shahverdiyev\source\repos\ARM-Template-Example> .\Deploy-AzureResourceGroup.ps1 -UploadArtifacts
PS C:\Users\jamal.shahverdiyev\source\repos\ARM-Template-Example> .\Deploy-AzureResourceGroup.ps1 -UploadArtifacts
Output of deployment:


Workspace path in the Azure where will be downloaded all code files:
C:\Packages\Plugins\Microsoft.Compute.CustomScriptExtension\1.9\Downloads\0\Scripts
C:\Packages\Plugins\Microsoft.Compute.CustomScriptExtension\1.9\Downloads\0\Scripts
DSC script path:
C:\Packages\Plugins\Microsoft.Powershell.DSC\2.74.0.0\DSCWork\jsDSC.0
C:\Packages\Plugins\Microsoft.Powershell.DSC\2.74.0.0\DSCWork\jsDSC.0
PowerShell script path:
C:\Packages\Plugins\Microsoft.Compute.CustomScriptExtension\1.9\Downloads\0\Scripts
C:\Packages\Plugins\Microsoft.Compute.CustomScriptExtension\1.9\Downloads\0\Scripts
Log files path in the Virtual machine:
C:\WindowsAzure\Logs\Plugins\Microsoft.Compute.CustomScriptExtension\1.9
C:\WindowsAzure\Logs\Plugins\Microsoft.Powershell.DSC
C:\WindowsAzure\Logs\Plugins\Microsoft.Compute.CustomScriptExtension\1.9
C:\WindowsAzure\Logs\Plugins\Microsoft.Powershell.DSC
To delete Resource Group with all of resources, just use the following command:
PS > Remove-AzureRMResourceGroup -Name ResourceGroupName -Force
PS > Remove-AzureRMResourceGroup -Name ResourceGroupName -Force
Advertisements